Palo Alto API tworzenie reguł – Python skrypt
by admin · Marzec 19, 2018
Korzystając z API możemy na firewallach Palo Alto dodawać reguły bezpieczeństwa bez konieczności otwierania interfejsu do zarządzania i tworzenia reguł wybierając odpowiednie opcje z menu.
ŚRODOWISKO
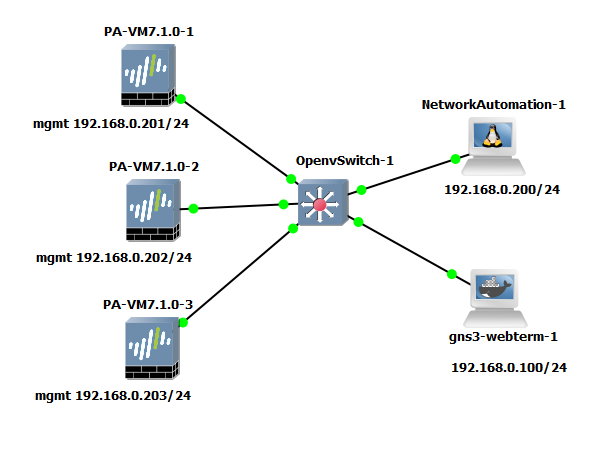
Do celów demonstracji możliwości tworzenia reguł bezpieczeństwa przy pomocy API na urządzeniach Palo Alto posłużyłem się topologią zbudowaną w GNS3, tą samą co w tym wpisie.
TOPOLOGIA
SKRYPT
Skrypt tworzący regułę bezpieczeństwa, przenoszący ją w odpowiednie miejsce a na końcu robiący commit zmian wygląda następująco:
config_palo.py
#!/usr/bin/python

import requests, getpass, re

## list of firewalls
firewalls_ip = [
 '192.168.0.201',
 '192.168.0.202',
 '192.168.0.203',
]

## login and password for firewall
username = raw_input("Please enter your username: ")
password = getpass.getpass("Please enter your password: ")

## generate api key
url = "https://192.168.0.201/api/?type=keygen&user={}&password={}"
response = requests.get(url.format(username,password), verify=False)
response.raise_for_status()
regex = re.compile(r'<key>(.*)<\/key>')
key = regex.findall(response.text)[0]
print ("\nYour API key is: %s\n") % (key)

rule_path = "/config/devices/entry[@name='localhost.localdomain']/vsys/entry[@name='vsys1']/rulebase/security/rules"
rule_name = "permit_any"

rule = """
 <entry name="{}">
 <to>
 <member>any</member>
 </to>
 <from>
 <member>any</member>
 </from>
 <source>
 <member>any</member>
 </source>
 <destination>
 <member>any</member>
 </destination>
 <source-user>
 <member>any</member>
 </source-user>
 <category>
 <member>any</member>
 </category>
 <application>
 <member>any</member>
 </application>
 <service>
 <member>any</member>
 </service>
 <hip-profiles>
 <member>any</member>
 </hip-profiles>
 <action>deny</action>
 <log-start>no</log-start>
 <description>permit any any rule</description>
 <disabled>no</disabled>
 </entry>
"""

for ip in firewalls_ip:

 print ("Adding security rule to: %s\n") % (ip)
 url = "https://"+ip+"/api/?type=config&action=set&key={}&xpath={}&element={}"

 response = requests.post(url.format(key,rule_path,rule.format(rule_name)), verify=False)
 response.raise_for_status()
 print (response.text)

 print ("Moving security rule ...\n")
 move = raw_input("Do you want to move security rule ? (y/n) ")
 if move == "y":
  rule_pos = raw_input("Insert rule name after which you want to place new rule: ")
  url = "https://"+ip+"/api/?type=config&action=move&key={}&xpath={}/entry[@name='{}']&where=after&dst={}"
  response = requests.get(url.format(key,rule_path,rule_name,rule_pos), verify=False)
  response.raise_for_status()
  print (response.text)

 print ("Commiting changes ...\n")
 commit = raw_input("Are you sure you want to commit ? (y/n) ")
 if commit == "y":
  url = "https://"+ip+"/api/?type=commit&key={}&cmd=<commit></commit>"
  commit_response = requests.post(url.format(key),verify=False)
  commit_response.raise_for_status()
  print (response.text)
 else:
  print ("Commit cancelled !\n")
Cały skrypt można ściągnąć pod tym linkiem.
Opis skryptu:
- Lista IP z firewallami na których chcemy stworzyć regułę bezpieczeństwa:
firewalls_ip = [
 '192.168.0.201',
 '192.168.0.202',
 '192.168.0.203',
]
2. Stworzenie klucza API KEY przy pomocy logowania użytkownikiem i hasłem do jednego z firewalli z listy (pod warunkiem ze na każdym FW mamy tego samego użytkownika i hasło, w innym przypadku klucz musimy generować dla każdego z FW osobno)
## login and password for firewall
username = raw_input("Please enter your username: ")
password = getpass.getpass("Please enter your password: ")

## generate api key
url = "https://192.168.0.201/api/?type=keygen&user={}&password={}"
response = requests.get(url.format(username,password), verify=False)
response.raise_for_status()
regex = re.compile(r'(.*)<\/key>')
key = regex.findall(response.text)[0]
print ("\nYour API key is: %s\n") % (key)
3. Stworzenie zmiennej o nazwie „rule” zawierającej regułę w postaci xml. Można taką regułę odczytać z pliku xml z konfiguracją. W powyższym skrypcie reguła zezwala na cały ruch z każdej strefy i każdego adresu do każdej strefy i do każdego adresu (allow any any)
rule_path = "/config/devices/entry[@name='localhost.localdomain']/vsys/entry[@name='vsys1']/rulebase/security/rules"
rule_name = "permit_any"

rule = """
 <entry name="{}">
 <to>
 <member>any</member>
 </to>
 <from>
 <member>any</member>
 </from>
 <source>
 <member>any</member>
 </source>
 <destination>
 <member>any</member>
 </destination>
 <source-user>
 <member>any</member>
 </source-user>
 <category>
 <member>any</member>
 </category>
 <application>
 <member>any</member>
 </application>
 <service>
 <member>any</member>
 </service>
 <hip-profiles>
 <member>any</member>
 </hip-profiles>
 <action>deny</action>
 <log-start>no</log-start>
 <description>permit any any rule</description>
 <disabled>no</disabled>
 </entry>
"""
4. Tworzenie reguły dla każdego firewalla z listy firewalls_ip:
for ip in firewalls_ip:

  print ("Adding security rule to: %s\n") % (ip)
  url = "https://"+ip+"/api/?type=config&action=set&key={}&xpath={}&element={}"

  response = requests.post(url.format(key,rule_path,rule.format(rule_name)), verify=False)
  response.raise_for_status()
  print (response.text)
5. Reguła stworzona w poprzednim punkcie jest tworzona i dodawana do konfiguracji na końcu. Zmianę miejsca reguły realizuje poniższy fragment skryptu:
 print ("Moving security rule ...\n")
 move = raw_input("Do you want to move security rule ? (y/n) ")
 if move == "y":
   rule_pos = raw_input("Insert rule name after which you want to place new rule: ")
   url = "https://"+ip+"/api/?type=config&action=move&key={}&xpath={}/entry[@name='{}']&where=after&dst={}"
   response = requests.get(url.format(key,rule_path,rule_name,rule_pos), verify=False)
   response.raise_for_status()
   print (response.text)
6. Commit zmian:
 print ("Commiting changes ...\n")
 commit = raw_input("Are you sure you want to commit ? (y/n) ")

 if commit == "y":
   url = "https://"+ip+"/api/?type=commit&key={}&cmd=<commit></commit>"
   commit_response = requests.post(url.format(key),verify=False)
   commit_response.raise_for_status()
   print (response.text)
 else:
   print ("Commit cancelled !\n")
Sprawdźmy działanie skryptu w praktyce:
Na początek sprawdźmy jak wygląda zakładka Policies -> Security na każdym z firewalli:
Teraz uruchamiamy skrypt…
root@NetworkAutomation-1:~# ./config_palo.py
Please enter your username: admin
Please enter your password:
/usr/local/lib/python2.7/dist-packages/urllib3/connectionpool.py:858: InsecureRequestWarning: Unverified HTTPS request is being made. Adding certificate verification is strongly advised. See: https://urllib3.readthedocs.io/en/latest/advanced-usage.html#ssl-warnings
  InsecureRequestWarning)

Your API key is: LUFRPT14MW5xOEo1R09KVlBZNnpnemh0VHRBOWl6TGM9bXcwM3JHUGVhRlNiY0dCR0srNERUQT09

Adding security rule to: 192.168.0.201

/usr/local/lib/python2.7/dist-packages/urllib3/connectionpool.py:858: InsecureRequestWarning: Unverified HTTPS request is being made. Adding certificate verification is strongly advised. See: https://urllib3.readthedocs.io/en/latest/advanced-usage.html#ssl-warnings
  InsecureRequestWarning)
<response status="success" code="20"><msg>command succeeded</msg></response>
Moving security rule ...

Do you want to move security rule ? (y/n) n
Commiting changes ...

Are you sure you want to commit ? (y/n) y
/usr/local/lib/python2.7/dist-packages/urllib3/connectionpool.py:858: InsecureRequestWarning: Unverified HTTPS request is being made. Adding certificate verification is strongly advised. See: https://urllib3.readthedocs.io/en/latest/advanced-usage.html#ssl-warnings
  InsecureRequestWarning)
<response status="success" code="20"><msg>command succeeded</msg></response>
Adding security rule to: 192.168.0.202

/usr/local/lib/python2.7/dist-packages/urllib3/connectionpool.py:858: InsecureRequestWarning: Unverified HTTPS request is being made. Adding certificate verification is strongly advised. See: https://urllib3.readthedocs.io/en/latest/advanced-usage.html#ssl-warnings
  InsecureRequestWarning)
<response status="success" code="20"><msg>command succeeded</msg></response>
Moving security rule ...

Do you want to move security rule ? (y/n) n
Commiting changes ...

Are you sure you want to commit ? (y/n) y
/usr/local/lib/python2.7/dist-packages/urllib3/connectionpool.py:858: InsecureRequestWarning: Unverified HTTPS request is being made. Adding certificate verification is strongly advised. See: https://urllib3.readthedocs.io/en/latest/advanced-usage.html#ssl-warnings
  InsecureRequestWarning)
<response status="success" code="20"><msg>command succeeded</msg></response>
Adding security rule to: 192.168.0.203

/usr/local/lib/python2.7/dist-packages/urllib3/connectionpool.py:858: InsecureRequestWarning: Unverified HTTPS request is being made. Adding certificate verification is strongly advised. See: https://urllib3.readthedocs.io/en/latest/advanced-usage.html#ssl-warnings
  InsecureRequestWarning)
<response status="success" code="20"><msg>command succeeded</msg></response>
Moving security rule ...

Do you want to move security rule ? (y/n) n
Commiting changes ...

Are you sure you want to commit ? (y/n) y
/usr/local/lib/python2.7/dist-packages/urllib3/connectionpool.py:858: InsecureRequestWarning: Unverified HTTPS request is being made. Adding certificate verification is strongly advised. See: https://urllib3.readthedocs.io/en/latest/advanced-usage.html#ssl-warnings
  InsecureRequestWarning)
<response status="success" code="20"><msg>command succeeded</msg></response>
Skrypt wykonał się z ostrzeżeniami, ale możemy je zignorować. Pojawiły się one, ponieważ wszystkie urządzenia posiadają domyślne certyfikaty, które nie są zaufane.
Zobaczmy teraz jak wyglądają polityki bezpieczeństwa po działaniu skryptu:
PODSUMOWANIE
Jak widać API na urządzeniach Palo Alto umożliwia w łatwy sposób tworzyć reguły bezpieczeństwa. Jest to bardzo przydatne w sytuacji, gdy musimy tą samą regułę stworzyć na wielu urządzeniach.


